 |
 |
 |
|
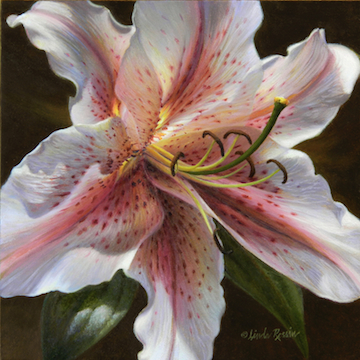
All these years you thought oil and water didn't mix. Well, guess again… when it comes to the latest in oil paint, they actually do. I’m not a big fan of all the solvents used for traditional oil painting and decided to try Holbine’s Duo Aqua Oil (water-mixable oil paint) for my latest florals. It is not suggested that you actually paint using water, but rather to use it for clean up, which sure makes this process a lot easier. I’m in love with the quality of this paint and certainly with the ease of clean up. And yes, they are REAL oil paints! When it comes to using traditional or water mixable oils, it is necessary to work fat over lean so the paint doesn’t crack over time since lean layers dry faster than fat layers do. This means less oil content in the thin under layers and more oil in the thicker upper layers. This is especially important if a painting will be worked on over a period of weeks, or even months. Since I often work in layers, I do use mediums such as W & N Water Mixable Thinner and Stand Oil. These help the rather heavily pigmented, heavier bodied Holbine Duo Aqua Oil paint to glide more easily over my working surface, which is vital when painting fine details. Lastly here’s what grisaille actually means: it is a method of painting in monochrome typically using gray or sepia tones. Below is an example showing how one of my oil paintings was developed using this method. Radiance - Lily: |
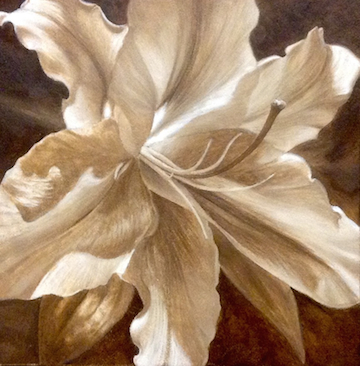 |
1. First my original drawing was transferred to the painting surface. I mixed burnt sienna with a tad of ultramarine blue, then thinned this combination with some water-mixable W & N Thinner. I began by putting in the background — where the darkest darks appear. I then proceeded to the halftones in the flower. While carefully avoiding the stamen and carpel, I started with the darker values in each petal and worked my way to the lightest lights until I was satisfied with my overall value scheme. I let this dry overnight. |
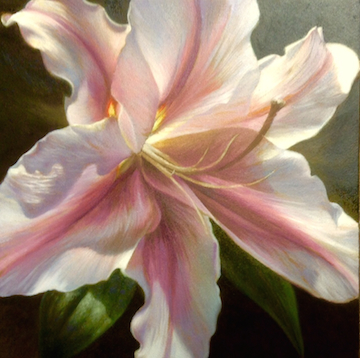 |
2. I began my actual color layer with opaque paint making sure to match the overall values of the monochromatic underpainting. For this application I mixed my paint with W & N Thinner and a tiny bit of Stand Oil -- both water-mixable. Once this second layer was complete, I let the painting dry before going on to the next and final step. |
 |
3.
|
| Once the painting was dry to the touch I sprayed it with retouch varnish to protect the surface. After this piece sat for nearly six months (a necessity) I applied the final varnish to “Radiance". |